Pages

Monday, 31 March 2014

How to fix Kali Linux slow update?

When we talk about update, we know that the client system is downloading an update and patches from the source(online- from the network resource or offline- cd/dvd or any other secondary source). Here, we are talking about online update only. Kali Linux is relatively new and have less mirror sites, so the less the mirror sites the more online users to access the server and utilizing all the bandwidth. When you type apt-get update on the terminal, it searches for the relative links for update from /etc/apt/sources.list. So, more the number of links in the repository file, the more time it will consume to search for an update. Below are the few necessary steps that you can perform to fix the issue.

STEPS:

1. Check if you got the right repositories in /etc/apt/sources.list. Please remove unwanted and un-necessary repositories from the sources.list. Click here for more.

2. Run apt-get clean to clear cache.

3. Run apt-get autoremove to remove un-successful installed packages.

4. Choose a fast DNS server. Click here to read this article. To add DNS server address, open terminal and type leafpad/etc/resolv.conf. Once you add the address of DNS server, save and exit the file.

Now, to keep Kali Linux up-to-date, type apt-get update, then apt-get upgrade and finally apt-get dist-upgrade.

Kali Linux Repositories

Hi Everyone! this is an updated post on Kali Linux repositories. Well, a repository is an archival source from where Kali Linux softwares are updated and upgraded online. sources.list is the file where all the links for necessary update are saved. When we execute a command apt-get update, it searches for the updated package online. Un-wanted or un-necessary links can cause failure of Kali Linux package installation, so make sure what link/s should be added to the repository so that Kali Linux should get proper update. 

Kali Linux distribution has three repositories, which are mirrored world-wide:

http.kali.org (mirrorlist): the main package repository;
security.kali.org (mirrorlist): the security package repository;
cdimage.kali.org (mirrorlist): the repository with ISO images.

On a clean installation, Kali Linux, have the following two entries present in /etc/apt/sources.list:

deb http://http.kali.org/kali kali main non-free contrib
deb http://security.kali.org/kali-security kali/updates main contrib non-free
These are called Regular repositories from where Kali Linux get its update. In case, you require additional package, then your can add valid package source. You might also want to add the following repositories as well. These are Sources repositories:

deb-src http://http.kali.org/kali kali main non-free contrib
deb-src http://security.kali.org/kali-security kali/updates main contrib non-free

Finally, do not forget to do an update Kali Linux on terminal by typing apt-get update && apt-get upgrade && apt-get dist-upgrade.


Suggestion from Mr. Phong Do. Mr. Phong Do, made a change by just replacing "http:" with "deb" and found update is much faster. Hi all, please check and update me in comments so that I can update the post accordingly. THANKS.

just change http to repo like this:
deb http://repo.kali.org/kali kali main non-free contrib

Installing Cheese


Cheese is an open source application that allows Linux users to access their webcam device and take pictures or created videos with funny effects. It is mostly used under the GNOME desktop environment. The application has no binary packages for a specific Linux distribution, only a source archive that allows advanced users to configure, compile and install it under any Linux-based operating system.

STEPS:

Before you install Cheese, make sure that you do update kali linux by running apt-get update command. For more please click here, if you didn't added repository.

1. Open terminal and type apt-get install cheese.

Allowing it by typing Y to continue dependency of the package.

2. Once Cheese is installed successfully, check the installed package from the menu list. Click on Applications--> Sound & Video--> Cheese to open the application.

Saturday, 22 March 2014

GNOME Tweak Tool

GNOME Tweak Tool is an application for changing the advanced settings of GNOME 3. Below are the features that GNOME Tweak Tool can perform.


  • Reset to defaults settings
  • Startup application management
  • Enable Application menu
  • Dynamic or Static Workspaces creation
  • Disable all extensions
  • Install/Update/Uninstall extensions
  • Font size, hinting and anti-aliasing
  • Icons on Desktop
  • Clock: Show Date and Seconds
To install GNOME Tweak Tool open terminal and run
apt-get update and then 
apt-get install gnome-tweak-tool
Once it install GNOME Tweak Tool, run gnome-tweak-tool to run the application

UVC device driver for Linux

UVC(USB Video Class) is a device driver for video streaming on Universal Serial Bus. The goal of this project is to provide all necessary software components to fully support UVC compliant devices in Linux. UVC specification covers webcams, digital camcorders, analog video converters, analog and digital television tuners and still-image cameras that support video streaming for both video input and output. UVC projects is currently focusing on kernel support for UVC devices. The driver implements the Video4Linux 2 (V4L2) API. This include a V4L2 kernel device driver and patches for user-space tools. Please click here to read the article and supported devices.

Friday, 21 March 2014

Installing Skype in Kali Linux

Before you proceed make sure that you run apt-get update from terminal. Check the necessary repository in sources.list file. For more please read this post.

STEPS:

1. Goto www.skype.com and click on Downloads.

2. Being a Kali Linux user, select Choose your distribution as debian and click Save File to download.

3. Open terminal and locate the downloaded file.

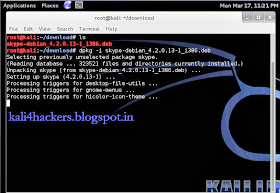
4. Run dkpg -i skype-debian_x.x.x.x_i386.deb (where x is the version of skype) to install the package.
5. Type skype to run the program.

6. Accept License agreement.

Tuesday, 4 March 2014

Check Disk space in Kali Linux

After installing Kali Linux on hard drive or on virtual machine, we may have come across with a warning message of "Low Disk usage". It happens when we allocate insufficient disk space during partition for kali linux or else when we do a regular "update" and "upgrade" of patches or downloading softwares. Kali Linux comes with a graphical built-in tool, i.e. Disk Usage Analyzer. This tool helps you to check the disk space usage. There are other options too, to check usage as per file system.

If you need to check from terminal(for non-gui users), then there are two classic commands available for every linux distros, i.e. 

(a) df: Report file system disk space usage
(b) du: Estimate file space usage

df command is used to check free disk space. You can type df -h or df -k to list free disk space. It displays statistics about the amount of free disk space on the specified file system or on the file system of which file is a part. Values are displayed in 512-byte per block counts.

du command is used to show how much space one ore more files or directories is using. Type du -sh where -s option summarize the space a directory is using and -h option provides "Human-readable" output.


Sunday, 2 March 2014

Troubleshooting Kali Linux Installation

There could be various reason for installation failure. Few of the basic reasons are corrupted downloadable file, damage media during writing an iso file, in-sufficient disk space, missing hash file etc. Click here to open the link and read this article on Troubleshooting Kali Linux Installation.