Saturday, 23 September 2017
About Kali Linux Certified Professional
Wednesday, 20 September 2017
Kali Linux 2017.2 Released
After 5 months, Kali Linux announces the release of Kali Linux 2017.2. This is a roll-up of all the updates and fixes of its predecessor. From its Debian flavor, Kali Linux 2017.2 has been added with dozens of new tools. Now you have to type "apt install" instead of "apt-get install" command. Few of the new and updated tools that are introduced in Kali Linux 2017.2 are mentioned below:
hurl – a useful little hexadecimal and URL encoder/decoder
phishery – phishery lets you inject SSL-enabled basic auth phishing URLs into a .docx Word document
ssh-audit – an SSH server auditor that checks for encryption types, banners, compression, and more
apt2 – an Automated Penetration Testing Toolkit that runs its own scans or imports results from various scanners, and takes action on them
bloodhound – uses graph theory to reveal the hidden or unintended relationships within Active Directory
crackmapexec – a post-exploitation tool to help automate the assessment of large Active Directory networks
dbeaver – powerful GUI database manager that supports the most popular databases, including MySQL, PostgreSQL, Oracle, SQLite, and many more
brutespray – automatically attempts default credentials on discovered services
Friday, 8 September 2017
Update Kali Linux 2017.1 via repository
I came to a peculiar situation when I tried to update Kali Linux 2017.1 via terminal. It shows me "Reading package lists... Done".
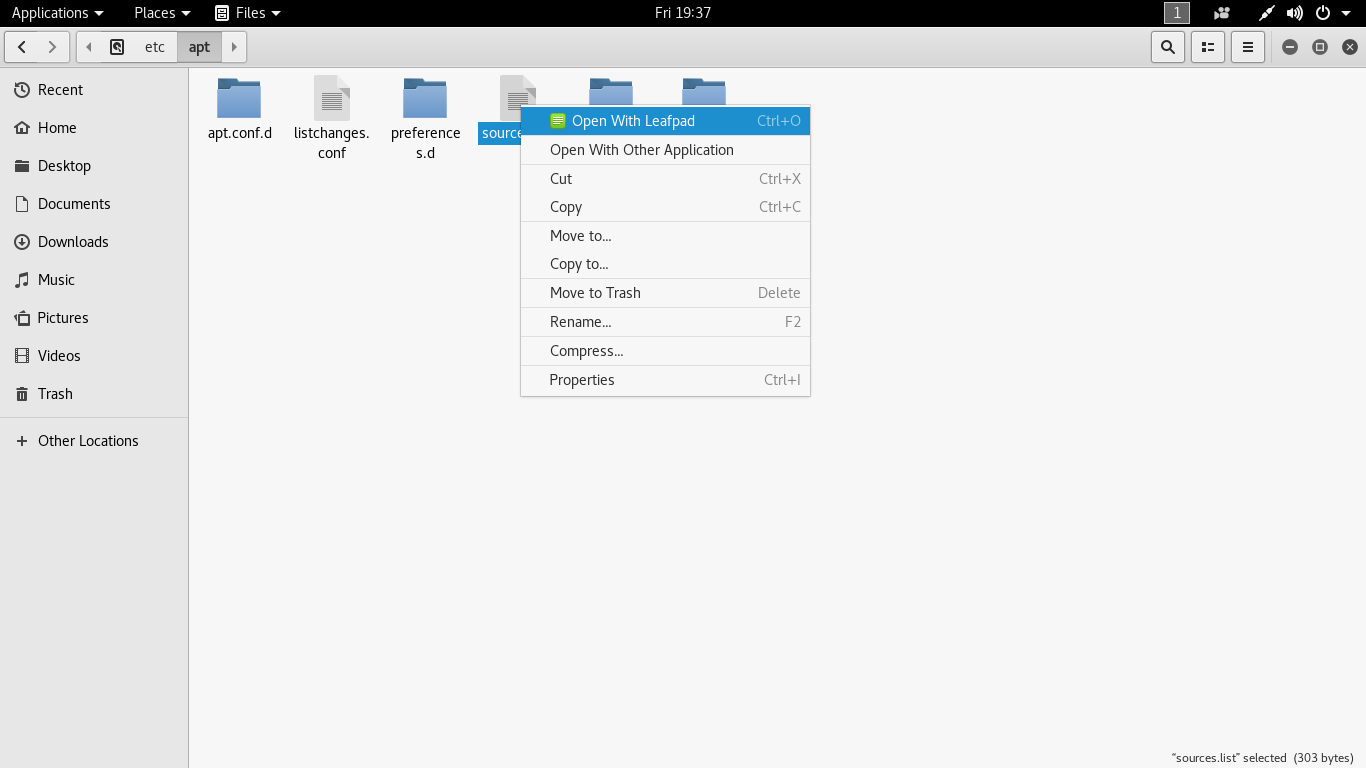
Then I navigate "sources.list" file to check if the repository in present or not. And, found the link to the repository was missing.
I added the repository link and saved the file.
And, then I tried to update Kali Linux 2017.1 via terminal and I was taking update.
Further I typed upgrade command and it worked too.
Then I navigate "sources.list" file to check if the repository in present or not. And, found the link to the repository was missing.
I added the repository link and saved the file.
And, then I tried to update Kali Linux 2017.1 via terminal and I was taking update.
Further I typed upgrade command and it worked too.
Labels:
Kali 2017.1,
repository,
update,
upgrade
Location:
Kashipur, Uttarakhand 244713, India
Saturday, 26 August 2017
Access Windows Folder via Kali Linux 2017.1
Most of the Windows users, who are new to Kali Linux, are eager to know how to access Windows files or Folders through Kali Linux. I would like to tell you that it is super easy to access windows files or folders through Kali Linux 2017.2 version. Simply share your Windows folder and access it through Kali Linux Network.
Here is how you can do it in few simple steps.
Login to the Windows System and goto the folder you would like to share on your network/s. On my Windows System I chose "Softwares" folder that I would like to share on my network. To share "Softwares" folder, I right clicked on it and select Properties. Then I chose "Sharing" tab, next to "General". On this pop-up box I clicked on "Advanced Sharing" button and it will bring "Advanced Sharing" pop-up window. I checked "Share this folder" so that this folder is visible to my network. I left the name "Softwares" in Share name box as is, however you can mention any name of this shared folder to your network. You can even limit the number of simultaneous users (for security purpose) to access this folder. You can even give description to the folder, in the Comment box, so that it would be easy for you to identify the folder you shared on your network. Finally, click on "Permission" button if you wish to modify files or folders from the other network. For security reason, I allow only "Read" mode.
Now login to Kali Linux as a root (Kali Linux is installed on my virtual machine). On top left of the Taskbar, click on "Places" and then on the drop down list click on "Browse Network".
This window will show your network. Now double click on your network and enter username, domain (mine is Workgroup) and password.
Once your credential is verified, you will see your shared folder and you can access files or/and folders to this network.
Tuesday, 25 April 2017
Kali Linux 2017.1 released
Kali Linux 2017.1 rolling release is finally available to download. It brings with a bunch of exciting updates and features. Like all new releases, you have the common denominator of updated packages, an updated kernel that provides more and better hardware support, as well as a slew of updated tools. But this release has a few more surprises.
- Support for RTL8812AU Wireless Card Injection
- Streamlined Support for CUDA GPU Cracking
- Amazon AWS and Microsoft Azure Availability (GPU Support)
- OpenVAS 9 Packaged in Kali Repositories
Please click here to download Kali Linux.
Saturday, 11 February 2017
acccheck
This tool is designed as a password dictionary attack tool, that targets Windows Authentication via SMB protocol. It's a wrapper script around 'smbclient' binary and as a result is dependent on it for its execution.
Server Message Block (SMB) Protocol is a network file sharing protocol and as implemented in Microsoft Windows is known as Microsoft SMB Protocol. The set of message packets that defines a particular version of the protocol is called a dialect. The Common Internet File System (CIFS) Protocol is a dialect of SMB. Both SMB and CIFS are also available on VMS, several versions of Unix, and other operating systems.
SMB can run on top of the Session Layer:
Directly over TCP, port 445;
Via the NetBIOS API, which in turn can run on several transports;
On UDP ports 137, 138 & TCP ports 137, 139 (NetBIOS over TCP/IP);
On several legacy protocols such as NBF (incorrectly referred to as NetBEUI).
The SMB “Inter-Process Communication” (IPC) system provides named pipes and was one of the first inter-process mechanisms commonly available to programmers that provides a means for services to inherit the authentication carried out when a client first connected to an SMB server.
The simplest way to run acccheck is a follows:
1. ./acccheck 198.168.10.1
This mode of execution attempts to connect to the target ADMIN share with the username ‘Administrator’ and a [BLANK] for the password.
1. ./acccheck.pl -t 192.168.10.1 -u test -p test
This mode of execution attempts to connect to the target IPC share with the username ‘test’ and a password ‘test’.
Each -t, -u and -p flags can be substituted by -T, -U and -P, where each represents an input file rather than a single input from standard in.
E.g.
1. ./acccheck.pl -T iplist -U userfile -P passwordfile
Only use -v mode on very small dictionaries, otherwise, this has the affect of slowing the scan down to the rate the system writes to standard out.
Any username/password combinations found are written to a file called ‘cracked’ in the working directory.
Server Message Block (SMB) Protocol is a network file sharing protocol and as implemented in Microsoft Windows is known as Microsoft SMB Protocol. The set of message packets that defines a particular version of the protocol is called a dialect. The Common Internet File System (CIFS) Protocol is a dialect of SMB. Both SMB and CIFS are also available on VMS, several versions of Unix, and other operating systems.
SMB can run on top of the Session Layer:
Directly over TCP, port 445;
Via the NetBIOS API, which in turn can run on several transports;
On UDP ports 137, 138 & TCP ports 137, 139 (NetBIOS over TCP/IP);
On several legacy protocols such as NBF (incorrectly referred to as NetBEUI).
The SMB “Inter-Process Communication” (IPC) system provides named pipes and was one of the first inter-process mechanisms commonly available to programmers that provides a means for services to inherit the authentication carried out when a client first connected to an SMB server.
The simplest way to run acccheck is a follows:
1. ./acccheck 198.168.10.1
This mode of execution attempts to connect to the target ADMIN share with the username ‘Administrator’ and a [BLANK] for the password.
1. ./acccheck.pl -t 192.168.10.1 -u test -p test
This mode of execution attempts to connect to the target IPC share with the username ‘test’ and a password ‘test’.
Each -t, -u and -p flags can be substituted by -T, -U and -P, where each represents an input file rather than a single input from standard in.
E.g.
1. ./acccheck.pl -T iplist -U userfile -P passwordfile
Only use -v mode on very small dictionaries, otherwise, this has the affect of slowing the scan down to the rate the system writes to standard out.
Any username/password combinations found are written to a file called ‘cracked’ in the working directory.
Thursday, 2 February 2017
The Kali Linux Certified Professional (KLCP)
After almost two years in the making, it is with great pride to announce Kali Linux Certified Professional certification– the first and only official certification program that validates one’s proficiency with the Kali Linux distribution.
If you’re new to the Information Security field or are looking to take your first steps towards a new career in InfoSec, the KLCP is a “must have” foundation certification. Built on the philosophy that “you’ve got to walk before you can run”, the KLCP will give you direct experience with your working environment and a solid foundation toward a future with any professional InfoSec work. As we continually see, those entering the Offensive Security PWK program with previous working experience with Kali, and a general familiarity with Linux, tend to do better in the real world OSCP exam.
For those of you who already have some experience in the field, the KLCP provides a solid and thorough study of the Kali Linux Distribution– learning how to build custom packages, host repositories, manage and orchestrate multiple instances, build custom ISOs, and much, much, more. The KLCP will allow you to take that ambiguous bullet point at the end of your resume – the one that reads “Additional Skills – familiarity with Kali Linux”, and properly quantify it. Possession of the KLCP certification means that you have truly mastered the Kali penetration testing distribution and are ready to take your information security skills to the next level.
* The KLCP exam will be available via Pearson VUE exam centres worldwide.
Upcoming Book- Kali Linux Revealed: Mastering the Penetration Testing Distribution
More exciting news! In the past year, Kali Linux Official Team has been working internally on an Official Kali Linux book – Kali Linux Revealed: Mastering the Penetration Testing Distribution. This is the first official Kali book from Offsec Press, and is scheduled for release on June 5th, 2017. Kali Linux Revealed will be available in both hard copy and online formats. Keeping the Kali Linux spirit, the online version of the book will be free of charge, allowing anyone who wishes to hone their skills and improve their knowledge of Kali to do so at no cost. This book, together with our official Kali documentation site will encompass the body of knowledge for the Kali Linux Certified Professional (KLCP).
Friday, 27 January 2017
Books on Kali linux
Please check out my page on Kali Linux books: http://kali4hackers.blogspot.in/p/books.html
Tuesday, 20 September 2016
Kali Linux 2.2016 Installation on VMWare
Hi Guys,
This is a New Installation of Kali Linux 2016.2, after a long post, of Kali Linux 1.0.3. The procedure of installation is same. I want to show you a new look and feel of Kali Linux Interface. Please go through step-by-step procedure of the screenshots provided for Kali Linux Installation.
Prerequisite:
---------------
1. kali-linux-2016.2-i386.iso (can be downloaded from https://www.kali.org/downloads/)
2. virtual machine that supports kali linux 2.2016 (I am using VMware-workstation-full-12.1.1-3770994)
3. Windows 7 or higher (I am using Windows 10 Pro)
Installation of Kali Linux 2016.2 (Step by Step):
----------------------------------------------------------
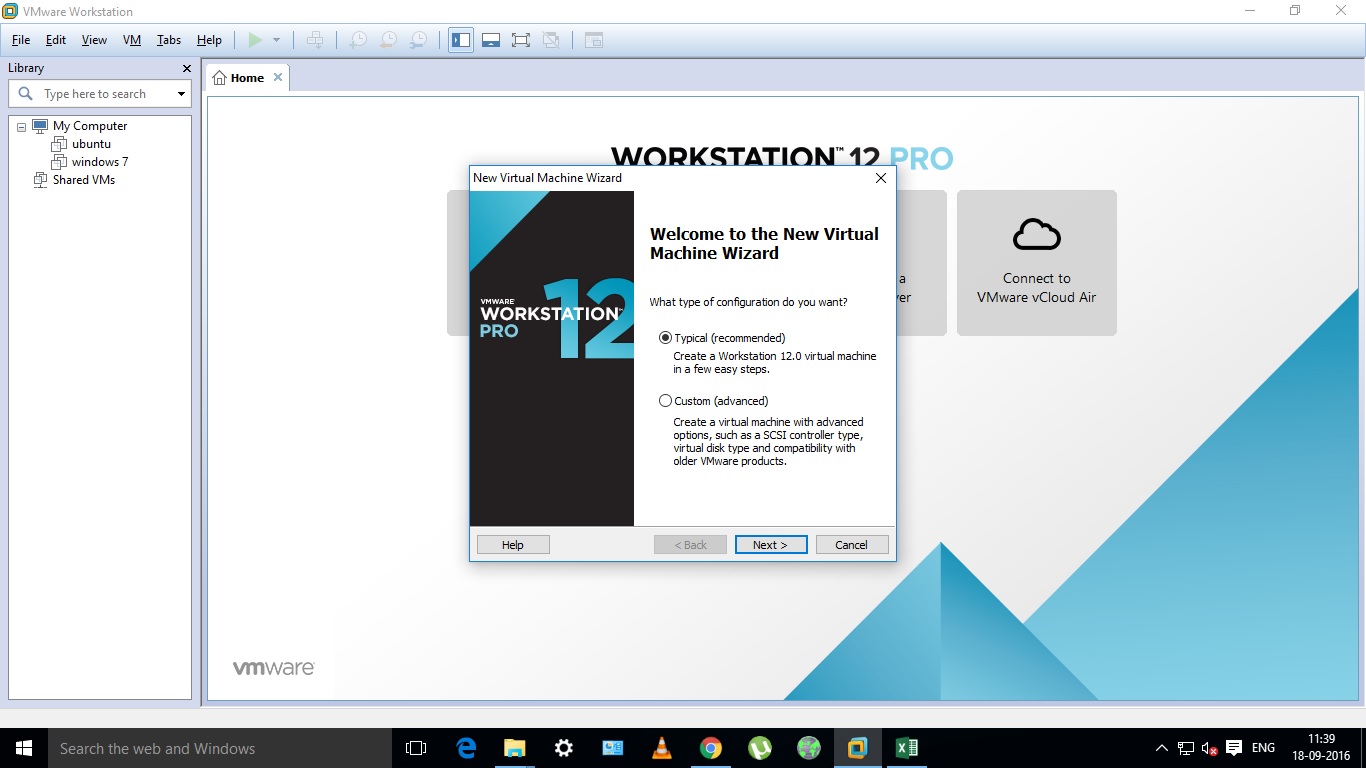
1. Open VMWare and select "Create a New Virtual Machine"
2. Select the option "Typical"), as recommended by VMWare and then click on "Next".
3. If you have Kali Linux DVD, then select "Installer Disc" or if Kali Linux ISO is stored in hard drive then select "Installer disc image file (iso).
4. Please select Guest Operating System as "Linux". The 2nd section, at the bottom, please select Debian 8.x as Version for 32-bit iso or select Debian 8.x 64-bit for 64-bit iso file, and then click on Next.
5. By default virtual machine name is "Debian". You can change it to "kali linux" and please select the location where you want to install Kali Linux.
6. Kali Linux 2016.2 needs 20 GB (recommended space) but you can increase its size limit, if your HDD partition have enough space.
7. The next pop-up window will show virtual machine settings.
8. You can customize virtual machine setting or if the configuring setting is fine then Power ON virtual machine.
9. The next screen shows GUI. Please select Graphical Install option. It will boot up to configure GUI. Below are the screenshots where you can select language, location, region and keyboard type. Once everything is fine, virtual machine will detect the CD/DVD or mount ISO file. Finally it will load its components, detect and configure network (if network hardware is found on the system).
10. If network hardware is detected properly on your system, then please type host-name, domain (optional) and password for your account. Once verified, it will detect assigned virtual disk.
11. The next window will show partition table. Please select Guided- use entire disk.
12. Select the partition disk where you can create partition.
13. In the next window, please select "All files in one partition" (recommended for new users) and then click on Finish partition and write changes to disk. Alternatively, you can customize your partition, where you have to create "/", "/home", "swap", "var", "temp".
14. Once partition is configured properly. Please select "Yes" to make changes on the disk. The next screen will show you the installation of Kali Linux 2016.2.
15. Once installation is complete, it will ask you to install updates from the network mirror. I skipped this option, as my internet is slow and so I select No and clicked on Continue. You can proceed if you have a high speed internet.
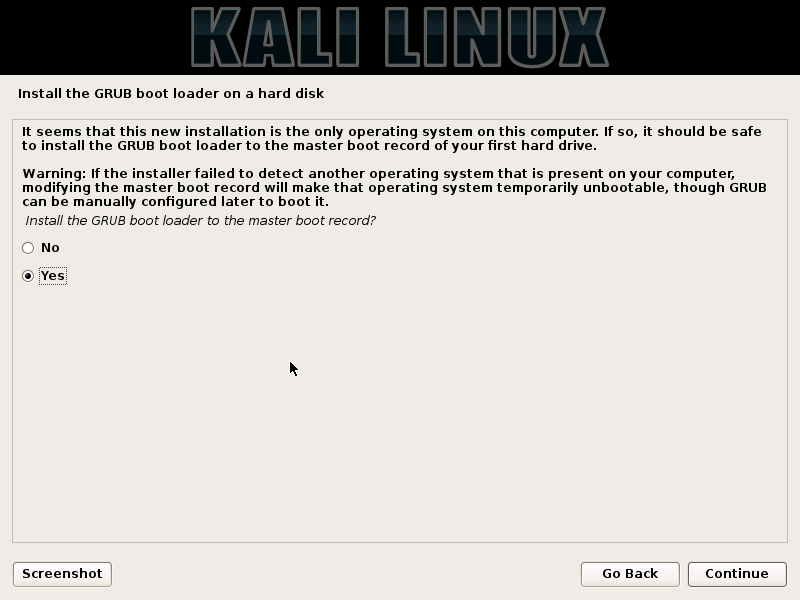
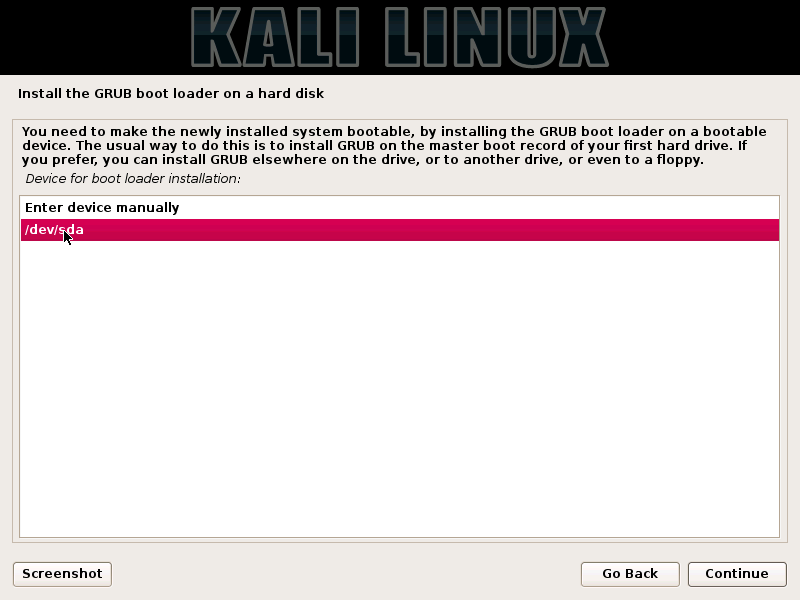
16. The next window will check and install Grub Boot Loader on your virtual hard drive. It will ask you if it can install on Master Boot Record. If you have multiple virtual OS install on VMWare then you can select as Yes and proceed. You can select the default boot path or can manually enter boot path for Grub installation.
17. Once Grub is installed on the selected location, Kali Linux comes to an end to finish its installation.
18. Once Kali Linux installation is complete, it will ask you boot to the new system. Please remove installation media and system is going to boot to a new system.
19. Kali Linux Grub Loader interface of a new system.
20. Please enter username and password of the new system installed.
21. A new look n feel interface of Kali Linux 2016.2.
22. To install VMWare Tools, please goto VM on VMWare menu and then select Install VMWare Tools. Once shows VMWare Tools CD/ DVD on Kali Linux desktop, please go through the installation process in virtual CD/ DVD.
This is a New Installation of Kali Linux 2016.2, after a long post, of Kali Linux 1.0.3. The procedure of installation is same. I want to show you a new look and feel of Kali Linux Interface. Please go through step-by-step procedure of the screenshots provided for Kali Linux Installation.
Prerequisite:
---------------
1. kali-linux-2016.2-i386.iso (can be downloaded from https://www.kali.org/downloads/)
2. virtual machine that supports kali linux 2.2016 (I am using VMware-workstation-full-12.1.1-3770994)
3. Windows 7 or higher (I am using Windows 10 Pro)
Installation of Kali Linux 2016.2 (Step by Step):
----------------------------------------------------------
1. Open VMWare and select "Create a New Virtual Machine"
2. Select the option "Typical"), as recommended by VMWare and then click on "Next".
3. If you have Kali Linux DVD, then select "Installer Disc" or if Kali Linux ISO is stored in hard drive then select "Installer disc image file (iso).
4. Please select Guest Operating System as "Linux". The 2nd section, at the bottom, please select Debian 8.x as Version for 32-bit iso or select Debian 8.x 64-bit for 64-bit iso file, and then click on Next.
5. By default virtual machine name is "Debian". You can change it to "kali linux" and please select the location where you want to install Kali Linux.
6. Kali Linux 2016.2 needs 20 GB (recommended space) but you can increase its size limit, if your HDD partition have enough space.
7. The next pop-up window will show virtual machine settings.
8. You can customize virtual machine setting or if the configuring setting is fine then Power ON virtual machine.
9. The next screen shows GUI. Please select Graphical Install option. It will boot up to configure GUI. Below are the screenshots where you can select language, location, region and keyboard type. Once everything is fine, virtual machine will detect the CD/DVD or mount ISO file. Finally it will load its components, detect and configure network (if network hardware is found on the system).
10. If network hardware is detected properly on your system, then please type host-name, domain (optional) and password for your account. Once verified, it will detect assigned virtual disk.
11. The next window will show partition table. Please select Guided- use entire disk.
12. Select the partition disk where you can create partition.
13. In the next window, please select "All files in one partition" (recommended for new users) and then click on Finish partition and write changes to disk. Alternatively, you can customize your partition, where you have to create "/", "/home", "swap", "var", "temp".
14. Once partition is configured properly. Please select "Yes" to make changes on the disk. The next screen will show you the installation of Kali Linux 2016.2.
15. Once installation is complete, it will ask you to install updates from the network mirror. I skipped this option, as my internet is slow and so I select No and clicked on Continue. You can proceed if you have a high speed internet.
16. The next window will check and install Grub Boot Loader on your virtual hard drive. It will ask you if it can install on Master Boot Record. If you have multiple virtual OS install on VMWare then you can select as Yes and proceed. You can select the default boot path or can manually enter boot path for Grub installation.
17. Once Grub is installed on the selected location, Kali Linux comes to an end to finish its installation.
18. Once Kali Linux installation is complete, it will ask you boot to the new system. Please remove installation media and system is going to boot to a new system.
19. Kali Linux Grub Loader interface of a new system.
20. Please enter username and password of the new system installed.
21. A new look n feel interface of Kali Linux 2016.2.
22. To install VMWare Tools, please goto VM on VMWare menu and then select Install VMWare Tools. Once shows VMWare Tools CD/ DVD on Kali Linux desktop, please go through the installation process in virtual CD/ DVD.
THANKS