Friday, 28 June 2013

Some basic commands for Kali Linux

File Operations
pwd                        Print Name Of Current/Working Directory
cd                         Changing The Working Directory
cp                         Copy Files Or Directory
rm                         Remove Files And Directory
ls                         List Of Directory Contents
mkdir                      Make Directory
cat                        Concatenate Files And Print On Standard Output
mv                         Move Files
chmod                      Change Files Permissions

Know Your System                                                 
uname                      Print System Information
who                        Show Who Is Logged On
cal                        Displays Calculator
date                       Print System Date And Time
df                         Report File System Disk Space Usage
du                         Estimate File Space Usage
ps                         Displays Information Of Current Active Processes
kill                       Allows To Kills Process
clear                      Clear The Terminal Screen
cat /proc/cpuinfo          Cpuinfo Display CPU Information
cat /proc/meminfo          Display Memory Information

Compression
tar                        Store and Extract Files From An Archive File
gzip                       Compress Or Decompress Named Files

Network
ifconfig                   To Config Network Interface
ping                       Check Other System are reachable from The Host System
wget                       Download Files From Network
ssh                        Remote Login Program
ftp                        Download/Upload Files From/To Remote System
last                       Displays List Of Last Logged In User
telnet                     Used To Communicate With Another Host Using THe Telnet Protocol

Searching Files
grep                       Search Files(s) For Specific Text
find                       Search For Files In A Directory Hierarchy
locate                     Find Files By Name

TOR for Kali Linux

Tor (used to stand for "The Onion Router", but it's no longer considered an abbreviation, so it's just "Tor"), is an anonymity network, used to surf the web (and more) anonymously. Basically, anyone running the Tor software on their computer runs a proxy, and traffic gets passed (encrypted) from one person running Tor to another person running Tor, multiple times through many users, until it get's to the page that you requested. Hence the term "Onion" used to describe it, since it works in "layers". Each person running Tor on their computer is called a "Node".

To the page (and anyone logging requests to that page, such as the website owner for example) they can only see the IP address of the last Node (called the "end node"). Any communication along the way, between you, when you request the website page, and the final destination, is encrypted, and cannot be analyzed. However, the last Node in the chain can log and view traffic through it, if the person running it is unscrupulous, so for that reason it can't be said that Tor is 100% anonymous.


TOR Auto-install Shellscript

#!/bin/sh
echo "deb http://deb.torproject.org/torproject.org wheezy main" >> /etc/apt/sources.list
clear scr
echo "[*] Installing the keys...."
gpg --keyserver keys.gnupg.net --recv 886DDD89
gpg --export A3C4F0F979CAA22CDBA8F512EE8CBC9E886DDD89 | sudo apt-key add -
echo "Ready!!"
clear scr
echo "[*] Updating Repositories...."
apt-get update
clear scr
echo "[*] Installing TOR"
apt-get install deb.torproject.org-keyring
apt-get install tor
echo "Ready!!"
echo "[*] Installing Vidalia"
apt-get install vidalia
echo "Ready!!"
echo "[*] Installing iceweasel-torbutton"
apt-get install iceweasel-torbutton
echo "Ready!!"
clear scr
echo "[*] Installing Privoxy"
apt-get install privoxy
echo "[*] Configuring privoxy"
echo "forward-socks5 / 127.0.0.1:9050 ." >> /etc/privoxy/config
echo "Ready!!"
service tor restart
service privoxy restart
echo "Tor has been installed successfully."


Save this script to a file like torinstall.sh and chmod +x it.
#chmod +x torinstall.sh
#./torinstall.sh

Tuesday, 25 June 2013

Thursday, 20 June 2013

Kali Cleaner: A small cleaner for Kali Linux

What it does?
It cleans apt cache.
Remove old config files.
Remove old kernels.
Empty every trashes.

What you can do is to save the script on your Desktop. Make it executable and clean kali linux.

Ex: root@kali:~/Desktop# ./kali_cleaner.sh

Download:
https://github.com/MasterButcher/kali-cleaner

or you can use command in terminal:
git clone https://github.com/MasterButcher/kali-cleaner.git

Tuesday, 18 June 2013

Kali Linux: A complete InfoSec Distro

BackTrack has always been a popular choice when it comes to security and penetration testing. This open source distro has gained a lot of popularity and was rolled till version 5 with frequent changes to the variants. This project from Offensive Security has been moved from Ubuntu to Debian and the operating system is now renamed as Kali Linux. If you have installed a fresh copy of Kali Linux, then you might have noticed some awesome security and penetration tools under Kali Linux drop down menu list. These tools are powerful and yet efficient to use.
If you go through the menu list of security tools, you might have noticed that few like Wireless Attacks, Forensics and Reverse Engineering is added, which is quite impressive. One more section has been added in the list, ie Hardware Hacking. One more thing that you would be happy to see is Arduino kit on the list. Arduino is a single-board microcontroller designed to make the process of using electronics in multi-disciplinary projects more accessible. The hardware consists of a simple open source hardware board designed around an 8-bit Atmel AVR microcontroller, though a new model has been designed around a 32-bit Atmel ARM. The software consists of a standard programming language compiler and a boot loader that executes on the microcontroller. The Forensic tools added were also quite impressive, thus making Kali Linux a complete security distro.
Another good option when it comes for the pen testing point of view was Stress Testing. Rather than checking out for different tools over the internet, tools have been provided for stress testing.
Though InfoSec professionals setup their own machines as per as their requirements. But Kali Linux is a complete InfoSec ased distro that gives you versatile features under one distro. The distro can be downloaded from the official page. ARM option gives power to tablet users this time.

Tuesday, 11 June 2013

How to access a drive or a folder in a network through Kali Linux

In this scenario, I have Windows 7 and Kali Linux operating systems. Kali Linux is installed in a virtual server, i.e. vmware player

(A) Now to create a shared drive or folder in Windows 7
  • Click on Start  and then on Computer
  • Select the drive or the folder you want to share. Right click on it, then click on Share with and then on Advanced sharing...
  • Goto Sharing tab and click on Advanced Sharing...

  • Check on Share this folder, then click on Add button to give Share name and Description of the drive or folder and select the number of users that you allow to share the drive or folder. Then click on permissions and add number of users to whom you grant permission to share your drive or folder in a network. Click on OK to all pop windows that has opened so far. This will take affect and you will see shared drive or folder in the network.

(B) Open vmware player and allow Kali Linux to boot.
  • Login with username and password
  • Press Alt. + F2 key to bring run dialog box. 
  • type smb://username/shared, where 'username' is the host name and 'shared' is the drive or folder name that has to accessed (smb is a program of samba distribution that allows to maintain interoperability between linux/unix server and windows client), then click on 'Run'.
  • type 'username' and 'password' of windows 7 user to access the drive or folder (username and password is the account of the user where the drive or folder has been shared) and click on 'Connect'.

This will mount the shared drive or folder and it will appear on the desktop of Kali Linux.

Wednesday, 5 June 2013

Debian Sources List Generator

1. goto http://debgen.simplylinux.ch/
2. click on 3rd party repos
3. fill the details as per your requirement and click on send
4. now select sources under Default Debian Packages and if necessary check on yes include, if source packages are required and then click generate sources.list button to generate your links
5. add them to etc/apt/sources.list
6. open root terminal and type apt-get update

Tuesday, 4 June 2013

** An Important Suggestion

A suggestion to those who want to experiment or do testing with their OSes. I suggest you not to make your system with dual or triple partition. If you are not sure with partition table or with boot loader, then you may mess up with mapping partition of OSes in boot loader. It's really a tedious job, and if the OS is not mount properly your important data may be lost which you may not able to recover in future. Dual partition makes you no good to your system other than the user interface to access different OSes of your choice. I suggests you to install virtual manager or server, like vmware player, oracle virtualbox, virtual pc in your OS, where you can experiment with different OSes, do testing, unlocking of codes, hacking and lots more than you can expect. Happy Hacking.......

Sunday, 2 June 2013

Install Kali Linux ARM on Raspberry Pi

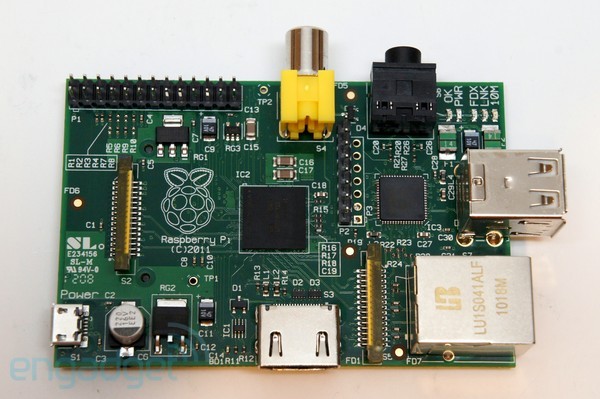
Before we begin, let me give you a brief introduction on Raspberry Pi. Well, a Raspberry Pi is a low budget, small credit-card sized ARM board, that acts as a computer. This board is developed by Raspberry Pi Foundation, UK with the intention of promoting the teaching of basic computer science in schools. The processor at the heart of the Raspberry Pi system is a Broadcom BCM2835 system-on-chip (SoC) multimedia processor. This means that the vast majority of the system’s components, including its central and graphics processing units along with the audio and communications hardware, are built onto that single component hidden beneath the 256 MB memory chip at the centre of the board. It’s not just this SoC design that makes the BCM2835 different to the processor found in your desktop or laptop, however. It also uses a different instruction set architecture (ISA), known as ARM. The ARM-based BCM2835 is the secret of how the Raspberry Pi is able to operate on just the 5V 1A power supply provided by the onboard micro-USB port. It’s also the reason why you won’t find any heat-sinks on the device: the chip’s low power draw directly translates into very little waste heat, even during complicated processing tasks.
Figure(1). Sketch of a Raspberry Pi Board

    Figure(2). Actual view of a Raspberry Pi Board

Figure(3). Raspberry Pi Board in a box

Figure(4). Raspberry Pi Board to work as a computer


Components needed to make Raspberry Pi to a Computer are:

• Raspberry Pi board
• Micro USB lead (for power)
• USB power adapter (also for power)
• HDMI lead: Type A to Type A (to connect to your monitor or TV)
• HDMI display
• SD card: 2 GB to 64 GB (for storage); 8 GB minimum recommended
• SD card reader
• USB keyboard and mouse

Now, let's get started installing Kali Linux for Raspberry Pi.

1. Download Kali Linux for Raspberry Pi image.
2. Use dd utility to image this file to your SD card. Assumed that the storage device is located at /dev/sdb. Please note that this process will wipe out your SD card. If you choose the wrong storage device, you may wipe out your computers hard disk.

root@kali:~ dd if=kali-pi.img of=/dev/sdb bs=512k

This process can take a while depending on your USB storage device speed and image size. Once the dd operation is complete, boot up your Rasberry Pi with the SD card plugged in. You will be able to log in to Kali (root / toor) and startx.